Clementine's Garage
Clementine the Cat
 
Image of flower
Yellow R4
 
Réparateur d'automobiles

Kind of barging in

morf774

New Member
Messages
2
Apologies for entering this fascinating world of Frenchness with my unsophisticated english ways, however I have a question...

On the body welding section here there are two before and after pics of the windscreen seam repair which looks good. Are there any more pics of how to do this kind of repair ?

I'm going to have to do a similar repair to an *cough MGBGT *cough and any help would be hugely appreciated, may angels sprinkle stardust on your children forever etc.
 
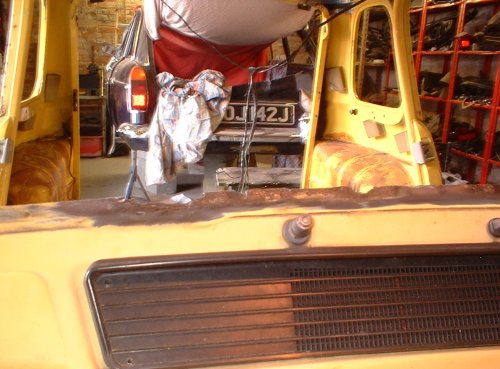
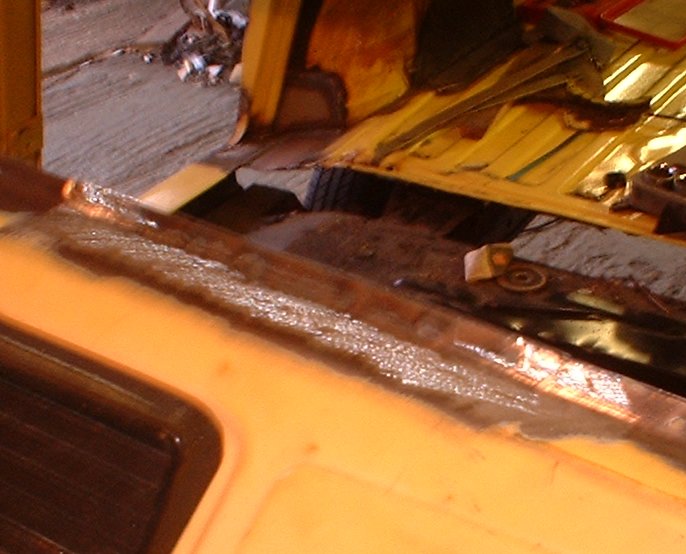
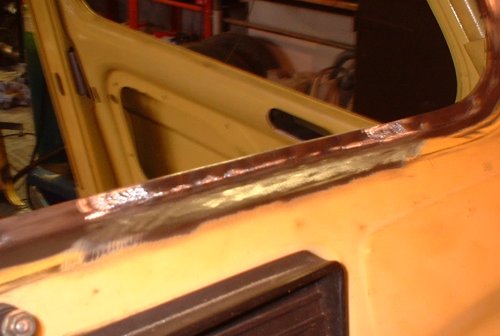
I couldn't find any more photos of the repair apart from the two below that don't help very much. On the Renault 4 the repair was reasonably simple. I chopped out a big section using an angle grinder - including the flange and around an inch width of each of the two panels that meet at the flange.

The section inside the car is flat on the Renault 4 so I just cut out a flat bit of steel about the right shape and seam welded it in.

The section outside the car had a bend and a slight curve. I made the new section to butt against the surrounding bits of metal, tacked it in place, plug welded the outer section to the inner section to remake the flange, then seam welded the outer section to the rest of the panel. With the excess weld ground off she looked as good as new.

This reminds me - I must pull the rear screen out of my MGB to do a bit of painting - the paint is coming off at the bottom and it's going rusty.

dscf0004b_100.jpg


dscf0007b_140.jpg


dscf0006b_748.jpg
http://www.renault4.co.uk/forum/files/dscf0006b_748.jpg
 
Last edited:
Many thanks. That description and additional pics is very helpful. I'm trying to go from something like this

MGB%20A-pillar%201.jpg


to this

MGB%20A-pillar%202.jpg


(this isn't my car)

and having 'fun' all the way, with a crap welder. But thats another story.

Apparently although this is a common repair on MGB's I can't find someone who has done it or can offer advice but yours came up on google.

My 4 year old son has a tiger just like Clementine so I printed off one of the pages a couple of months ago and convinced him his tiger could repair my "rusty car". Next day he opened the garage and put the tiger in so it could work at it whilst he was away at nursery. Fine but he did need washing as I was paint stripping at the time and the floor was dirty.

Thanks again, I may hang around if thats OK ? I like R4s too.

If anyone else has done something similar please feel free to advise. I am very new at this (still on my first 0.45 KG welding wire roll).

Chris
 
We probably bought our tigers from the same place. They do frogs too!

If you have a few small holes then you could probably just clean up the edges and fill the holes with MIG. That would save a lot of time and effort.

It's a tricky shape in there, and bending steel into compound curves is tricky. If you have to remove a large area it's probably best to do the job in a number of small sections - cut out a small bit and weld in a new bit, then repeat until finished.
 
Mt first mig welder was a cheap clarke - and I struggled like billy'o to get a decent weld, changing to 0.8mm wire made quite a difference, 0.8 is easily available but you need to change the nozzle tip as well, -these need changing when they get burnt anyway so buy a bag of half a dozen.
I've now got a proffesional quality mig and welding is so much easier with it, but I still use 0.8 wire!
As with anything to do with car repairs preperation is 95% of the job, get rid of all the rusty metal, and cean it up well, get the repair patch so it sits nicely on the job before you start to weld.
Before you grind think of where the sparks are going, - they can easily stick into glass and plastics and fabrics - cover everything up well.
Good luck with your repair
 
welding

the biggest difference i found was changing from co2 to a co2/argon mix which is far superior in terms of weld quality and avoiding blowing holes etc....ade
 
Yes I agree, have tried the stuff out of the back door of the pub, but when I dug my hands in my pocket, went down to BOC and I now use 'argoshield light' and it was like a different welder. - well worth the cost. - and the bottle rent.:wink:
Another good purchase was an automatic visor - one that turns dark when you strike up:cool:. But as with anything to do with fixing cars you can keep on spending and spending and spending. Now about the diag kit for the latest....
How much????
 
I'm a big fan of 0.6mm wire these days. Takes a little getting used to initially but helps get the current lower for welding Renault bodywork. Argoshield definately. There are a few companies that sell bottle rental free Argoshield like gas, but they are South West and Kent. Makes a lot of difference though.
 
Right then I will have to try some 0.6 wire then now that my welding skills are improved to what they used to be.
Could be just the thing as I will soon be cutting and welding Buttercup, (my latest project), she isn't quite a 4 but a 4cv.
Might stick some piccies in your gallery anyway if there is anybody interested in seeing her in her hour need.
 
It would be great to see photos of the 4CV under restoration. Last one I saw was at Geneva airport. Was really tired and fed up. Came out of the door and an elderly gentleman puttered past in a lovely blue/grey 4CV which made my day!

Feel free to post progress on the forum too - the paperclip in the little icons above where you post lets you upload photos, and the little down arrow beside it lets you put the photos where you want them inside your post.
 
Back
Top