


You are using an out of date browser. It may not display this or other websites correctly.
You should upgrade or use an alternative browser.
You should upgrade or use an alternative browser.
Peppers Renault 4
- Thread starter pepper
- Start date
pepper
Pepper The One and Only!
- Messages
- 2,251
Latest update, I've stripped the interior out of BB ready for painting of the chassis inside. It had an awful lot of glass everywhere! I'm busy waxoyling all the cars that are going to be used over the winter at the moment so thats taking an awful lot of time up!
pepper
Pepper The One and Only!
- Messages
- 2,251
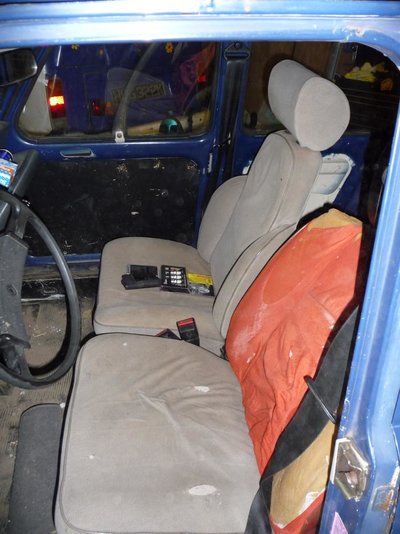
Doh I meant to post pictures of the interior before removal of the seats.
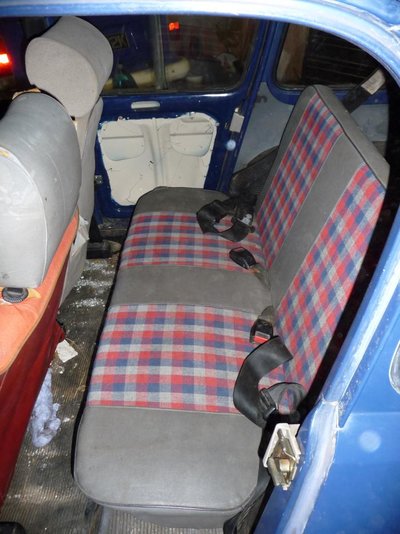
Rather nasty front seats they are too, I reckon they are out of a 5TS but the back of the drivers seats been rebuilt with another seat and is a lvoely shade of Orange!
The rear red check seat is in good condition though. The front door panels are just plain black, would that have been the correct type of door panel originally fitted?
Just realised that the back of Judiths bus is in the phots flowers and all!
pepper
Pepper The One and Only!
- Messages
- 2,251
Today we had a little drive down to Fordingbridge to pick up a spares car from a lovely chap called david.
The poor thing had been written off due to an accident a couple of years ago and was recently advertised on the forum for spares.
The lady who owned the car had had it from new, ordering it in Holland (through the NAAFI I think) but it is right hand drive.
She was rammed at the rear which pushed her into the car in front and the insurance wrote the car off.
There are a mulititude of spares on the car and we even drove her onto the trailer.
So far I've earmarked a huge list of bits and pieces to put on BB, including
Door Mirrors
Front Seats (which have headrests)
Radio Arial
Radio console
Front overriders (nudge bars)
Steering wheel
Ashtray
Speedometer which has both miles and kilometers
Wheels are all matching and are in better condition than the ones on mine
Exhaust much better fitting than the version on BB
And thats just a brief look over the vehicle
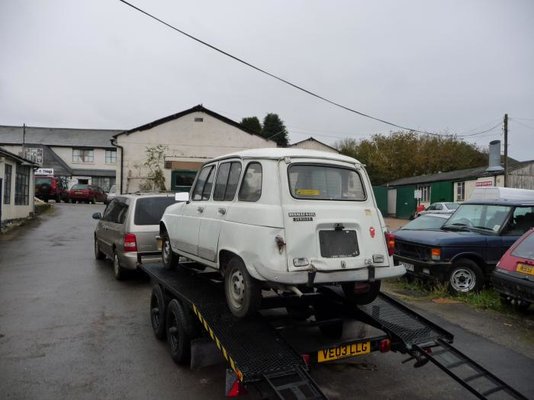
Here's the poor car being loaded onto my trailer, after which we travelled down to Poole to visit our friend and then made our way back in the atrocious weather conditions that is the 2008 UK Autumn.
The poor thing had been written off due to an accident a couple of years ago and was recently advertised on the forum for spares.
The lady who owned the car had had it from new, ordering it in Holland (through the NAAFI I think) but it is right hand drive.
She was rammed at the rear which pushed her into the car in front and the insurance wrote the car off.
There are a mulititude of spares on the car and we even drove her onto the trailer.
So far I've earmarked a huge list of bits and pieces to put on BB, including
Door Mirrors
Front Seats (which have headrests)
Radio Arial
Radio console
Front overriders (nudge bars)
Steering wheel
Ashtray
Speedometer which has both miles and kilometers
Wheels are all matching and are in better condition than the ones on mine
Exhaust much better fitting than the version on BB
And thats just a brief look over the vehicle
Here's the poor car being loaded onto my trailer, after which we travelled down to Poole to visit our friend and then made our way back in the atrocious weather conditions that is the 2008 UK Autumn.

malcolm
& Clementine the Cat
- Messages
- 4,608
- Location
- Bedford UK
Would there be any merit in repairing the white one instead? It looks much less messed around with than the blue one, and doesn't look like it would need much (assuming the chassis is straight and not rusty).
The seats in the blue one are R5 Mk1 Gordini. I have a set if anyone wants some and would like to also take the rest of a terminally rotten R5 Gordini that has lost it's engine.
The seats in the blue one are R5 Mk1 Gordini. I have a set if anyone wants some and would like to also take the rest of a terminally rotten R5 Gordini that has lost it's engine.
pepper
Pepper The One and Only!
- Messages
- 2,251
The blue one looks messed around but is a lovely straight chassis, with a solid rear end, this ones been welded up on the rear chassis.
Funnily enough though, I'd just said to my father that with some new inner wings it wouldn't have been that hard to get back on the road, it looks like the chassis slipped under the car that it hit and the inner wings above it took the brunt of the impact.
There's everything on this car that I need to get BB back on the road again then my friend who's a paint sprayer owes me a favour so I'll be whipping it up to him for a quick respray.
jjad
Enthusiast
- Messages
- 1,614
- Location
- Herefordshire
Malcolm, I'm interested to see if your Gordini seats' headrests are similar to the ones I now have for Richie. I wonder if the 'sockets' which fit into your Gordini seats would fit R4 seats?
jjad
Enthusiast
- Messages
- 1,614
- Location
- Herefordshire
Thanks for the information Pepper, it looks as if I am barking up the wrong tree with the 'solid' headrests I got. Maybe I'll just have to stick with our one 'hard' headrest with the hole in the middle.
Looking again at the picture of the blue R4, the driver's headrest looks a bit like the solid headrests I have.
Apart from the accident damage, your white R4 looks good! Will be interesting to see updates on how you get on.
Thanks, Jonathan
Looking again at the picture of the blue R4, the driver's headrest looks a bit like the solid headrests I have.
Apart from the accident damage, your white R4 looks good! Will be interesting to see updates on how you get on.
Thanks, Jonathan
pepper
Pepper The One and Only!
- Messages
- 2,251
Today I had a good look under the white Renault 4, and wow it did take a crunch, the chassis is totally creased at the rear with the boot floor pushed up by over 2 inches.
I've started stripping the car to put the better parts onto BB, so far its lost its
Heater fan
Speedometer for its miles an hour speedo
Oil pressure switch as I realised the tab was broken on BB
Pedal rubbers
Rear right hand door lock
jjad, the solid headrest you have is the same as the drivers side headrest, but those are the same as the ones in the white Gtl I've just started breaking.
pepper
Pepper The One and Only!
- Messages
- 2,251
A quick update seeing as there isn't much else going on around these here parts at the moment.
I've stripped all the seat carpets and sound proofing out of BB and have resealed and painted the floor pan with good old Smoothrite. There are two tiny holes in the floor pan so I drilled them round and fitted grommets in the holes and seam sealed them in.
I've finished fitting new brake pipes all round including all the flexibles (jeez they dont make the left hand side with the brake regulator easy do they?)
During that one of the bleed nipples was a little rounded off so I'm going to pick up a set of new ones tomorrow and its then ready for bleeding through. Then the brakes are all sorted again.
After that its a case of getting the underside cleaned off ready for a good old waxoyling/Hot oil session and a coat of schutz over the underside.
malcolm
& Clementine the Cat
- Messages
- 4,608
- Location
- Bedford UK
Sounds like good progress. I'm hoping to use an alternative (Spanish) type of brake regulator that has a nice flexy direct to the suspension arm rather than that fiddly pipe.
What are you using for rust proofing exactly? I've used hot waxoyl in the past but have been disappointed by it's penetration into seams. And given that rust starts in the seams it would seem handier not to have all that flammable stuff in the box sections beside them when you are trying to weld them back up. Following extensive testing underneath my MG (oil leak) I'm thinking of using new engine oil next time. Maybe semi-synthetic as that smells nicer than old fashioned 20/50.
Need to do something similar myself shortly. Ornella had a pressure wash today in preparation for a good rust proofing.
quatrellefan
Enthusiast
- Messages
- 11
I have found a combination of waxoyl using a compressor and paraffin gun and Supertrol which is very thin and creeps into the seams to be very effective on 2CVs. Cars I treated 20 years ago still have rustfree chassis!
have just given my R4 the same going over.
Rob
have just given my R4 the same going over.
Rob
pepper
Pepper The One and Only!
- Messages
- 2,251
Well I finally dragged my butt out of the chair and went up to the workshop and finished bleeding my brakes and adjusted all the shoes up.
I then gave the floorpan another coat of smoothrite.
I'd taken the rear bumper off the car due to the irons being slightly bent and needing straightening, trouble was the inner studs sheared off in the rubber overriders and the outer bolts were seized in place. So I had quite a task getting everything fixed again.
The overriders were drilled then some threaded bar was dropped in and welded up and then I looked at the coach bolts left seized in the bumper. In the end I welded nuts onto the tops of the coach bolts which then gave me a grip and the heat helped unsieze the threads on the nut and off they popped.
Now all Ive got to do is finish straightening the bumper up flat it down and its ready for a coat of paint.
Now wandering off to ebay to find some nice stainless steel coach bolts (ebays very good for these sort of things)
Here we go
http://cgi.ebay.co.uk/ws/eBayISAPI.dll?ViewItem&Item=260304092178&Category=9895null
malcolm
& Clementine the Cat
- Messages
- 4,608
- Location
- Bedford UK
I googled that supertrol last night, as its an aerosol it may be just the ticket for the creeping issue we were discussing previously, they recommend 3 cans to completely do a whole car!
I'm hanging fire to see what you do on this. It doesn't feel like a good answer to me to have to use a penetrating fluid prior to stuffing up the chassis members with something that won't penetrate. They say you have to repeat every year anyway (and nobody does) but if there were an easy and cheap way to do so we might.
In summary we're all waiting for a magic new invention. In future perhaps we might Pepper our cars rather than waxoyl them.

Good find on the bumper bolts. Stainless is the answer for those dudes.