Clementine's Garage
Clementine the Cat
 
Image of flower
Yellow R4
 
Réparateur d'automobiles

1975 Renault 6TL - the fine line between brave and stupid

Originally lower swivels were fitted to 1 welded stud m7 and rivets 6mm diameter
Replacement had 6mm holes for m6 10mm head nuts and bolts
About 1980 ? Cars built using 7mm fixings
I always drill out to 7mm as old stock swivels often still 6mm holes using 7mm nylocnuts and ht bolts
 
On the upper ball joints one of the bolts won't physically fit the other way around, it's too long to go in from the bottom as it catches on other components. Putting it in the way I have the bolt clears everything in all the articulations I can get the suspension and steering to go. On the lower ball joints, since the captive bolt points thread-down I matched that with the other bolts as that made most sense. Also, on the lower ball joints having the thread point up ran the risk of it catching on other components.

The bolts supplied were longer than the ones I've fitted and wholly inappropriate having a mix of flat and cross heads which meant you couldn't get them tight enough. That and they were of such poor quality one of them was bent when it came to removal, it's not clear why because there are no marks to indicate it was catching anything. I guess the supplied fixings were just really, really poor quality rubbish.
 
Reno: These are all 8mm bolts and nylocs, including the captive bolt and nyloc. I didn't drill the holes bigger, I just used the hole size in the new ball joints and the arms.
 
29th May 2016

Today it was decided to make a proper effort on the front brakes. Luckily, my brother turned up because it was one of *those* jobs as it happens. Is there a reason French cars have to have daft brake set ups? It's really annoying. The front discs on the 6 are sandwiched between the two halves of the hub. It's a very silly design and does not make changing discs easy, I was not happy about this job. The wording in the Haynes book was also less than good (as has come to be expected of it) so some improvising had to happen. The advise is to remove three of the disc retaining bolts and put in some longer bar and then the bolts to push the two halves of the hub apart. You can't use a hub puller as there's nothing for the arms to attach to and you have to split the hub to get the disc out.


We started by trying out some what should have been toughened bolts with the heads chopped off in place of the rod suggested in the book. That just resulted in a small amount of movement and bent threaded bar.

20160529-02.jpg


Then we found some better, longer bolts and some nuts and devised a method that actually worked. We removed all of the disc retaining bolts so it could be pushed back off the hub face, then put a longer bolt through with a nut on the back. Three bolts were used in total to push the hub apart, it worked very well. When the bolts proved to be a little too short we improvised using some closed-end wheel nuts that had a flat seat one side and a dimple the other, rendering them perfect for the job.

20160529-01.jpg


Then one of the replacement bolts decided it didn't like being threaded any more so we had to rejig with just two. Much slower going and with a great deal of care taken but we did get there in the end.

20160529-03.jpg


With the outer half of the hub off it's really easy to replace the disc but we found it very difficult to keep the bearing, driveshaft and hub halves lined up on the car so removed the hub and put it all together on the workbench before sliding the whole hub back home onto the drive shaft and ball joints. Surprisingly easy to bolt back together and now we know how not to do it, the other side should be much easier. Nice to see shiny things on the car.

20160529-06.jpg


In no time the old disc was heading binwards and the new one was sitting pretty on the car where it belongs.

20160529-07.jpg


Next was the caliper. The piston was seized and over extended but otherwise complete and in good order. We were particularly surprised when the bleed nipple and flexihose unbolted from the caliper without difficulty. The old brake fluid that came out was a less pleasant surprise, smelled just like rat wee. I was surprised there was any fluid in the system at all.

20160529-08.jpg


The second set of brake pads I bought were correct, happily.

20160529-04.jpg


They were also very needed.

20160529-05.jpg


The caliper was taken apart as much as it would go and with some persuasion the piston was convinced to move again. Another pleasant surprise that. Before reassembling the caliper we wanted to make sure fresh fluid was getting through the system from the master cylinder. Filled up the tiny reservoir, which is a challenge because of the various cables that run over the top of it.

20160529-09.jpg


Gave the pedal a few goes and nothing. Cracked off the brake lines from the master cylinder and... nothing. Cracked off the big nut on the end to see if it would at least let all the fluid in the reservoir leak onto the floor but nope, nada, zilch. That'll be a dead master cylinder then, which is hardly surprising. I need one like this which has two outlets on the top and one outlet on the driver's side.

20160529-10.jpg


20160529-11.jpg


Tidied up, put the wheels back on and left it at that for today. As an aside, I had difficulty pushing the car today to get it where I wanted it to go, just wouldn't budge! Guess which moron had left the handbrake on? Still, at least half the brakes work.
 
2nd June 2016

Today I stole a few minutes while having lunch and commandeered Mike into helping replace the master cylinder that arrived this morning. A fiddly job, made more annoying by a lack of access and, for the lower bolt and pedal plunger assembly needing two people to keep it all lined up and frustration at a minimum. Old (right) and new (left) on the bench, thankfully it is the correct part and they are identical apart from condition.

20160602-01.jpg


Cleaned the pedal plunger bit up because it looked a bit worse for wear before putting it all back in the car.

20160602-02.jpg


The brake fluid reservoir was fitted with a new copper crush washer to replace the old one. Refitting is slightly more fiddly than removal, there's very little space to actually get tools, let alone hands, into the gaps around this part. All three brake lines reattached without any bother at all.

20160602-03.jpg


Pedal side of it all went together fairly easily and was given a new split pin. Pedal actually feels to travel properly now even without fluid in the system, it feels more as a brake pedal should where before it was just sort of floppy.

20160602-04.jpg


We bench tested the starter motor and it sounds all kinds of broken. The solenoid isn't activating, the bearings sound like they're made of gravel and it's spinning pretty weakly when it does bother to actually work. Only had enough time to refit the points but not to gap them yet. I'm hoping to find some time over the weekend to get the front brakes finished. Starting the engine is still going to have to wait a while.
 
3rd June 2016

I had an unexpected half-day today so spent my spare time on the Renault, it's rare I get the luxury of bonus car time. Decided the best thing to do would be to get the brakes finished and take some pictures to illustrate how the front discs are done. After removing the wheel and putting it on stands, put the car in reverse to undo the hub nut if you haven't someone to help brace the wheel and then undo the nuts holding the disc to the outer hub. After that, put some bolts through the holes in the hub so the end of the thread rests on the disc face.

20160603-01.jpg


I had three bolts I could use and this makes life easier. Fit a nut on the bolt between the outer hub and the disc brake. Working on one bolt at a time, tighten the bolt with a spanner holding the nut to ease the hub apart. It's steady going, but quick enough really. Changing discs is hopefully not a job you do that often.

20160603-02.jpg


You do need to get the outer hub to move quite a long way and my bolts weren't long enough. I spaced them out with some sturdy wheel nuts that have a solid dimple in one end and good flat face the other. This allowed me to remove the outer hub completely and safely.

20160603-03.jpg


With the outer hub off, you remove the old disc, put the new one on and refit the outer hub. I was quite lucky on this side as the hub halves went together very smoothly. A little bit of hammering was required to knock the outer hub home but once you've got enough driveshaft thread through you can put the bolt on and tighten it up. You might need to use the hammer to help a bit as I did on this one but eventually you get the hub safely back together and can then bolt the disc in place. After that be sure to tighten the hub nut.

20160603-04.jpg


With both discs now renewed, the new pads could be fitted. It's a bit of a faff and I found the best way was to bolt the carrier to the hub with the pads in and then fit the caliper and shims and pins in situ. The last thing to go on was the dust shield and then the brakes were bled pushing out lots of air and a bit of really disgusting contaminated old brake fluid.

20160603-05.jpg


20160603-07.jpg


The old pads that came out were very dead.

20160603-06.jpg


After getting the fronts bled the brake pedal felt quite good and my brother and I jacked up the rear end to see if they worked on the pedal. I knew the rear brakes did work on the pedal when it came off the trailer over a year ago but hadn't tested them beyond that. Happily, both wheels stop satisfactorily on the pedal and the handbrake works, whether it's good enough for the MoT remains to be seen but I'm satisfied that we now have functioning brakes on all four corners.


But wait, there's more!

20160603-08.jpg


The filler work on the roof was completed and the paint put on. I've gone for a unique approach of layering different coloured aerosols to make the repaired areas blend in with the rest of the car and not jump out. It's so effective I'm running with it for everything. Some dents are left in on purpose because they're part of this car's story and will be a talking point when I get to using the car, I'm sure. The camera has mostly picked out purple on the passenger side but there's red, blue and beige over the green and blue paint already on the car in this area.

20160603-09.jpg


20160603-10.jpg


20160603-11.jpg


The small bit of damage that was welded on the rear wing was given the same treatment, to good effect.

20160603-12.jpg


20160603-13.jpg


The driver's side got the filler work finished and the final coat of paint on, orange instead of purple on this side until the orange ran out.

20160603-14.jpg


20160603-15.jpg


Of note is the small peep/overtaking mirror that I got for very little on eBay. It was originally destined for the Princess but was far too small so became a neat addition for the Renault.

20160603-16.jpg


I think the next job is likely removal and refitting of the windscreen so the reversing light wiring, headlining, rear side windows and dashboard can all go back in as that's the biggest job on the list. I will attempt an engine start when I have the help available which might be this weekend. I'm running out of jobs to do, which is very nice. I have very little on my shopping list too, just two generic exhaust clamps, the headlight and a set of tyres.
 
I've never read the haynes manual on removing discs
Official method involves using slide hammer
Me I've always used copper hammer and hit the scrap discs from behind rotating evenly
Or I would of fitted discs while hubs were off car and used a suitable drift on centre of hub to knock it apart
Guess you don't need master cylinder I sorted out for you that's sitting with headlamps and back lenses waiting for you to contact me
 
The brakes on the front are not a system I've come across on discs before, I found it a very strange way of doing things so it was a bit of trial and error. I wanted to wait until the brakes were done before I got in touch about what parts I needed from yourself. The master cylinder was bought for me by my brother and it arrived so quickly it allowed us to crack on with the rest of the job promptly. I hope you don't take it as a slight, that's not how it was intended, the job just ran away with me a bit.

If you can let me know how much and where to send cash for the headlamps and rear light lenses I'd appreciate that. I couldn't find a manufacturer mark on the lenses so my only identifiers are that the driver's side has the low bottom screw holes and the passenger side has the high bottom screw holes. If you have one of each that would be ideal.
 
As long as you get it all sorted it's just doubtful wether there are any other customers gor these parts will try and find your email from last time ☺
 
£200 in Jan 2014 would of been enough for you to have made a visit and cleaned me out of R6 parts and provided you with 99 percent of all you have bought including the rebuilt engine new clutch starter brakes panels and everything that I had duplicate R4 common parts plus a lifetime subscription to my dedicated helpline ☺
 
I know, and I'm a terrible person for not being in a position to take advantage of that situation. I'm also useless with the telephone and keeping up with things, much more than ever I used to be. Money is unpredictable most of the time, the peril of being self-employed, and all too often the useful job lot turns up when I can't afford it and then, as Sod's Law dictates, it's all gone when I do have the cash. Frustrating for all concerned. So it's been a case of picking things up as and when finances, motivation and time allow. Anyway, we don't want my life story do we? That's rather dull. Let's have another progress update...

Crumbs, another busy day on Crapaud. I bought some new spring clips for the sill trims so I could get those back on. The old clips had rusted out for the most part and were a nuisance to remove. The new clips were even more of a nuisance to fit but I persisted and got there. Cleaned off the rust and flakey paint on the sills and then popped one trim on which fitted well enough, pushed the end caps home which have seen better days and this side was done.
20160604-01.jpg


The other side it turns out the trim strip is considerably shorter than it should be. I only found this out after fighting with all the trim clips because I'd foolishly assumed it would be the correct length. Never mind, it doesn't bother me, just part of what this car is all about.
20160604-02.jpg


Windscreen was popped out. This has to be the easiest windscreen I've ever removed. The seal had some sort of sealant gunge which meant the top wasn't sitting flush with the frame and allowing water to get trapped. The driver's side had loads of sealant for no real reason and the passenger side practically none. The windscreen has been out before as the green repaint was underneath everything. The whole surround and the seal - which is in surprisingly good shape - were cleaned to get rid of the sealant and rust and so we could make a start on the next job...
20160604-03.jpg


Fitting the headlining. After popping all the rods into the relevant holes, the rear tension was set by putting the special plastic piece into the grip rod and then pressing the grip rod down where it was lifted from the previous headlining removal. At the front, a little bit of good strong adhesive was applied before putting the tension on and holding it all down with pegs. It works exceptionally well.
20160604-04.jpg


Once it's all dried, the excess fabric and pegs are removed and then the side tension can be set.
20160604-05.jpg


There was a couple of inches of excess fabric to remove before I could tuck it away into the grip rods and to prevent puckering on the seams, the roof bow pleats were split (on the fabric, not the stitches) to allow the new headlining to fit smoothly. Here it is before trimming and after front-to-rear tension has been set.
20160604-06.jpg


I had thought some of the fabric needed to go in the rear side window holes as when I removed the old headlining that's where it was. However, the grip rod runs all the way to the back so I put it back in there which is much neater. It also reveals where the respray was done by masking off the old headlining but removing the rear side windows. To fit the fabric for side tension you get a large, blunt screwdriver and, working from the seams, push the fabric into the grip rods. If any of the grip rods (I've typed grip rods too many times, it's lost all meaning now) need it, gently tap them down to hold the fabric. It's a really, really fast way of doing a headlining, I like it.
20160604-07.jpg


Repeat on the other side until complete. The finished article is really satisfying and it's made the interior a nicer place to be.
20160604-09.jpg


With that done, attention could turn to refitting the side windows. I managed to fit this one back-to-front on the first attempt so it had to come out to be refitted, but it was done with a little grunt by my brother and I.
20160604-10.jpg


The other side got the same treatment. This went much easier when we found a length of suitable cord but it was still a difficult window to put in due to the shape of it.
20160604-11.jpg


Finally, the windscreen went in. It sits in the frame much better than it did before it was removed. I didn't have the special tool for fitting the chrome trim but I do have a tried and tested technique using fingers and a screwdriver carefully. I also found climbing onto the bonnet of Renault 6 from the side is very difficult because it tips much more than you expect.
20160604-12.jpg


With all the glass in and the headlining fitted I faffed about refitting the dashboard and then the mirror - which I cleaned the stem on since it had too much green paint on one side - and the visors.
20160604-13.jpg


Another shot with flash, so you can see the rabbits.
20160604-14.jpg


Mike was in briefly and ran the wiring for the reversing lights, we just need to wire up a switch to operate the existing ones or find some that work from the non-powered switch in the Renault's gearbox. The wiring is at least in for the reversing lights now which makes them easier to sort in the future. Happily running out of jobs to do now.
 
No, I haven't got it running yet. I did some other things instead, easy things since I'm just shattered today after the mega long, mega late stint yesterday. Namely, for the first time in while, Crapaud went back outside now that the weather can be kept out. Very, very dusty little car and in desperate need of a scrub and clean out.
20160605-01.jpg


There wasn't really anything left in the boot; an exhaust system, a mud flap, the side trims. It did need a clean out as it was full of filler dust and grinder dust and mud. Same with the parcel shelf and supports, I still have the bits of carpet for the supports, they were just put safely out of the way when I took the picture.
20160605-02.jpg


I'm still delighted with the headlining. It's settled out nicely now the fabric has had chance to relax out the few wrinkles there were.
20160605-03.jpg


Once outside I could get the hose and the soapy water and give the car a bath. That probably seems ludicrous when you look at it, but it felt pretty horrible to touch with the chalky paint and all the workshop detritus. I don't mind scruffy, but I can't abide dirty. This did highlight the windscreen does have a couple of minor leaks, exaggerated by the cloth headlining wicking the water up. I'm going to put some Captain Tolley's Creeping Crack Cure in as it seems to have a 100% satisfaction reputation by all who have used it. I suspect the windscreen frame is slightly deformed which is causing this small amount of leaking which became apparent after I'd taken a toothbrush to clear off some moss on the seal and thrown really quite a lot of water at the windscreen and seal to find out how leaky it really was. Interestingly, the leaks don't correlate with the corrosion I did find on the screen or any visible damage.
20160605-04.jpg


20160605-05.jpg


I tried out a few different cleaners on the seats but they were actually really clean, just sun damaged. They got pretty hot when I was cleaning the car in the sunshine, there's a thing that brought back some childhood memories! All the glass got the once over inside and out and the whole car ended up feeling far nicer and less inclined to transfer dirt onto clothing and hands.
20160605-06.jpg


20160605-07.jpg


20160605-08.jpg


20160605-09.jpg


20160605-10.jpg


20160605-11.jpg


I will get around to drilling out the old rusted bolts from the mudflap brackets so they can be refitted properly, I've got to cut through the one bolt holding the mudflap on wonkily to get it off the car. The only thing I couldn't clean was the last of the mud out of the arches, I didn't have high enough water pressure at the unit and I didn't want to subject them to the terror of a pressure washer, just in case. Instead, I screwed the washer foot pump back down and gave it a go. I've never tested this, I didn't check the lines or unblock the washer jets, just tipped in some water to see what would happen.
20160605-12.jpg


Crikey, it works! It's about as feeble as the wipers, but it works.
20160605-13.jpg


I'm sure you'd love to see a video of it in action.
http://vid845.photobucket.com/albums/ab16/volksangyl/Renault 6TL/20160605-14.mp4

With Crapaud tucked up next to the Princess it seemed the perfect opportunity to get a picture of the whole gang together at last.
20160605-15.jpg
 
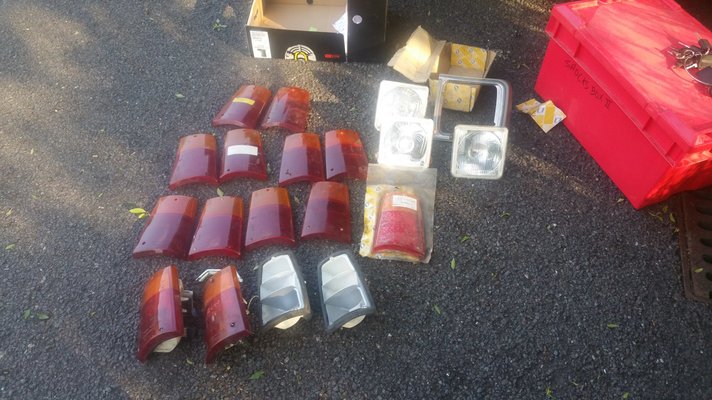
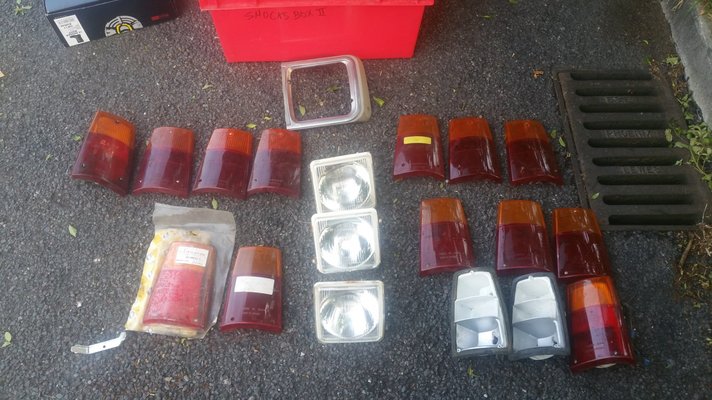
Finally sorted all the headlsmps rear lenses and bases out and boxing some up for you tomorrow hopefully
First pic as they came out of my box 20160607_184444.jpgnext pic sorted into sides and different manufacturers ☺20160607_184956.jpg
 
I did say I was pretty well stocked with renault 6 parts
Hopefully I can find a home for the rest
 
Been finding myself very short on time just lately so there's not been a great deal of opportunity to work on the car. That doesn't mean I've not done anything at all, it's just taken longer to get an update together. The very, very important news is that a headlight arrived! With many, many thanks to Mr Reno of this here forum for the help with possibly the most difficult part to source for this car.

20160614-01.jpg


Then we had a weird problem. If you turned the headlights on the new passenger side one would be very dim and go even dimmer on main. We checked the wiring, the bulbs, earth points and the lot and nothing could be found as the cause. Mike then put it all back together and now the driver's side one wouldn't come on at all with dip beam. Curious, I unplugged things and plugged them back in again and hey presto, everything works. Renault + electrics = no surprise there.


Sidelights (which have to be on for the headlights to come on)

20160614-02.jpg


Dipped beam.

20160614-03.jpg


Main beam. There is a more noticable difference in person.

20160614-04.jpg


Spotlights!

20160614-05.jpg


I should just about be able to see where I'm going with all of those on. At the rear, the replacement light lens were fitted. I need to replace the driver's side unit completely as the one I was sent has a reflector in it while the one fitted doesn't, Ijust haven't had the motivation to grub around in the still muddy wheel arch to do it. You don't access the rear light clusters from inside the car where all the electrical connections would be nice and clean and dry, you do it in the inner wing where the rear wheels can cover them in crap. Hadn't realised how faded the old ones were until these were fitted.

20160614-06.jpg


The horn on the Renault was deader than a dead thing so grabbed a bass tone escargot from the Princess stash which suits the car surprisingly well.

20160614-07.jpg


Struggling to find anywhere to put my manual reversing light switch, there's not really any dashboard to fit it to. It does match the interior really well so it will find a spot eventually. The red telltale will be a nice visual reminder that the reversing lights are on. This is the cheaper, easier option to fit as the gearbox reversing light switch isn't compatible with the type of reversing lights fitted to the car, they need a separate switch for reasons that were explained to me but that I don't really understand.

20160614-08.jpg


Got the inner sill 'carpets' fitted and plonked the lower parcel shelf in place but haven't had time to bolt it down.

20160614-09.jpg


20160614-10.jpg
 
Important things happened today because the starter motor was returned all nicely refurbished. I had planned to do the windscreen sealing since the new sealant arrived this morning but starter motor playtime was much more exciting. Turned out the bearings were shot, the arm that engages the solenoid was snapped and it was half full of water. Now it is not and works lovely.

20160615-01.jpg


Then set about putting the hoses back on and finding out what's missing or not. The carb has a weird set up (to me at least) with a breather pipe from the rocker cover and what I assume is a vacuum pipe from the the manifold to T piece. The T piece is broken and the vacuum pipe has a bolt in the end of it but a replacement is already sorted.

20160615-02.jpg


20160615-03.jpg


Unfortunately after stripping the radiator down and taking it to a local company it turns out that it is knackered. It's repairable if I can't find a brand new one, I don't want to buy a second-hand one. The steel crimped section between the plastic ends and the aluminium fins has blown on one corner which is quite likely what contributed to the signs of the car overheating in the past.

20160615-04.jpg


Now for the important bit. The battery was a bit flat when we tried this but nothing ventured, nothing gained, we gave the engine a quick go on the starter. No fuel in the car and I haven't set the ignition timing, this was just to check everything turned freely.

http://vid845.photobucket.com/albums/ab16/volksangyl/Renault 6TL/20160615-07.mp4


I'm still excited about that.
 
The pipe between manifold and t piece is designed to have a plastic piece in the bore.with 1.2mm hole
Will run awful.if left out
Best off temporarily blanked like it has been b4
Been discussed very recently elsewhere on forum
 
If I replace it as stock, which is the intention with the new T piece with reducer as per the original - the broken off plastic bit is still in the hose so I can see the shape it should be - it shouldn't be a problem, I'd expect. I'd rather un-bodge this if I can and put it how it ought to be. Looks like it was broken a very long time ago, possibly even before the car was laid up.
 
Well, since my last update all was not well. We had spark, fuel, oil pressure, compression but no firing. I'd got to the point where I didn't know what on earth to do and then someone from another forum visited and discovered the timing was off. The upshot of that is a couple of curved pushrods and one really bent one but no other damage. The other issue was that the engine wouldn't turn by hand, it was a little stiff when it went in but after getting lubricant around everything and whatnot the engine would only turn on the starter. That meant hauling the engine back out which I really didn't want to do and the car got put aside for a while. Until today.


Today I finally got chance and was motivated enough to pull the engine out of the Renault and get to the bottom of this problem. Originally I had wanted to get the sump off with the engine in the car, this was thwarted by the chassis blocking access to the sump bolts. This engine is horrible to work on when it's in the car. So I determined to haul it out, which is a big horrible job.

I just knuckled down and got on with it and, amazingly, just an hour and a half later I'd managed to do it completely solo. I didn't even remove the face, but I will be when I put the engine back in because it's an absolute war getting the engine and box out with the face attached.
20160912-01.jpg


I found I could leave a lot of things attached which sped up the job quite a bit and will make reinstalling the engine and gearbox that much easier. You can see the flange on the chassis rails which obscures access to the sump bolts here too. The anti-roll bar also prevents you from dropping the sump that far even if you could unbolt it. Horrible.
20160912-03.jpg


I cheated with the driveshafts. I need to replace some of the balljoint bolts because, as highlighted previously, I'd put them in 'upside down'. That meant that a couple of the lower ones got bent out of shape and were tricky to remove, unlike the top ones which were unaffected but could do with being flipped around. Not a big deal. So that I didn't have to disconnect and drain the brake system again I propped the hubs up on a pair of spare axle stands to take the stress off the flexible hose.
20160912-02.jpg


With the engine and gearbox wheeled indoors I just beat the weather turning. I didn't have a huge amount of time, thankfully I did have a checklist of possible problem areas:

Starter motor - removed and found to be working perfectly fine, as well it ought considering it's only just been reconditioned. This was not locking the flywheel and eliminated as a possible problem.

Gearbox - there was a concern the layshaft could have got stuck. Happily this too was ruled out as it turns freely by hand. I can't say anything about the condition of the gearbox beyond that as it's an unknown quantity.

Clutch - no problems apparent. Clutch fork is still operating the release bearing. None of the visible components have any problems apparent.

At each stage we tested to see if the crankshaft would turn and it wouldn't so we got to the point that the sump was removed for inspection. First thing was to inspect the contents of the sump. Unsurprisingly there's a little bit of sludge that must have been pumped out of the nooks I couldn't get into but no sparklies or chunks of metal or anything that might cause any alarm. There was what looked like grit at first, you can see some in the reflection, but if you squidge it with your finger it's just little blobs of sludge. The oil in the car, which is brand new, is still fairly opaque with just some discolouration from the muck that's still floating around. Not a problem because this oil is only put in to flush the engine through anyway, it's just doing its job.
20160912-04.jpg


That only left one area, which was the bearings themselves. Happily, access is really easy to all this. I'm doing it laid on its side rather than on the engine stand as to get the engine to bolt on to the engine stand means removing the clutch and I don't want to do that. This way works just fine. I was very fortunate in that Accord83 on the Retro Rides forum very kindly provided a Renault 6 workshop manual which has all the information I'll ever need including the torque settings for the bearing caps. Here's the thing, I'd set this and the timing according to the instructions in the Haynes manual and not only was the timing wrong but the bearing caps were all torqued up too tight. Doing things by the book is fine, providing the book you're using is actually any good.
20160912-05.jpg


I'd already run out of time by this point but I hung on for a few minutes resetting the caps, checking the bearing shells and guess what? Now the engine turns by hand, like it should. Here's where I feel a bit unsure about putting the engine back in the car because last time it went in I as sure the engine turned over by hand, it was stiff but it turned, and then when all the oil got circulated it stopped being able to be turned by hand. This time it turns very smoothly and very freely by hand, everything is well oiled and I'm hoping it doesn't tighten up on me when it goes back in the car. If I can find some way of bench testing it before refitting it I will.

I'll set the timing and build everything up while it's out of the car, just like I did last time, but this time I'll refer to the new Workshop Manual and probably put the Haynes book in the bin where it belongs.
 
Back
Top