Clementine's Garage
Clementine the Cat
 
Image of flower
Yellow R4
 
Réparateur d'automobiles

1975 Renault 6TL - the fine line between brave and stupid

Just a little job today. Went and picked this little lot up.
20170130-01.jpg


One of the rims needs attention. Going to give it a good going over with a power tool, paint the bit the tyre sits against and pass it back to them to get the fifth tyre fitted. Not mega important just yet.
20170130-02.jpg


Looks better for new tyres. Annoyingly, I have found that one back brake has now joined the party and stuck on so I only have one functioning rear drum now, the other three are all stuck on. I've not had chance to do anything about it.
20170130-03.jpg


20170130-04.jpg


I went for Kumho Solus tyres as they were middle of the road on price and ratings. Engineered in Korea is proudly printed on the label, though what that actually means is really anyone's guess. £7 per rim for fitting, balancing, new valves and disposal of the old tyres and inner tubes. Plus VAT.

Just waiting on the solder arriving so the air jet/emulsion tube can be repaired and we can see if that's fixed it. If it has, then super! If not, new carb time. Also still waiting on news from the supplier in the Netherlands that supposedly has the correct radiator. With the time it's taken I expect it'll be another not-in-stock result as it has with every other supplier. We'll get there, not much to do now and the days are getting longer so it's starting to get easier to get the time in on it.
 
Nice to see that I'm not the only one enjoying the longer days :) Here its just not the renault who need tlc but my east block MZ.
 
It is nice to have some daylight to work with, that's for sure! It's warming up a bit too which also makes jobs a lot more pleasant.

Today I got the choke cable fitted, finally. It's been a bit of a faff and I've had several attempts at this only to have the cable vanish once it was pushed into the guide in the dashboard. Today, with the help of a knitting needle, I bested it!
20170205-01.jpg


You have to sort of fish around through the flaps in the scuttle section until you hook the cable and then you can feed it through the grommet into the engine bay.
20170205-02.jpg


20170205-03.jpg


That's a job off the list. I also did a first-assembly of the carburettor that Mike cleaned up. Final assembly will be done now I know everything is there, this is just to show how nice and shiny it now is so not everything is present in these shots.
20170205-07.jpg


20170205-08.jpg


20170205-09.jpg


The guttering on one end has twisted and peeled a bit for some reason. I'll likely just glue this back down with some PU adhesive at some point, it can wait for now.
20170205-04.jpg


My thanks to Mr_Bollox (from other forums) for his contribution to the project in the form of this important period accessory.
20170205-05.jpg
 
Today I did some work on the Renault and failed to tick off any jobs on my list. Oh well. I wanted to try and get it running since the new radiator arrives next week and I'd got the emulsion tube/air corrector repaired and the carburettor all rebuilt. So, plonked the carburettor on the car, reconnected the battery, stuck the key in the ignition and.... dead. Flat battery. So I had to get the big red booster pack out.
20170218-01.jpg


Which worked quite well. Key back in the ignition and we have life. Also, strangely, the headlights came on main beam once the jump leads were connected even though I'm sure the lights hadn't been left on, it's the sort of thing you would notice and you can't put main beam on by accident. Very odd, anyway, got the lights turned off and let the car charge up for a little bit.
20170218-02.jpg


Tried again. I'd rebuilt some of the vacuum/breather system, you can't get the original Renault T piece and my old one was so fragile it broke even more when repair was attempted. Therefore, I've used a modern T-piece and various lengths of pipe to mimic what was originally there. I'm missing the one that runs from the T-piece to the rocker cover because I didn't have a suitable diameter piece of pipe but since I wasn't sure that it was enough to stop the car running, I tried it anyway. You can also see here where the float drain bolt had leaked onto the manifold, I did tighten the bolt up after the photograph was taken, it just needed a quick tweak. If nothing else, it provides proof that fuel is indeed reaching the float chamber.
20170218-03.jpg


As a last ditch attempt we put a short squirt of Easy Start into the carb which rewarded us with a big bang and a little bit of fire at the carburettor and nothing more. So, from my limited experience, I'd say the ignition timing and/or plug leads are in the wrong order. Also, I suspect the pipework around the carburettor and the restriction of the T-piece are inadequate at present to make it work as it should, I understand that it provides some sort of pressure to allow fuel to be drawn through the carburettor correctly. I know a couple of the pipes connect to the cooling system too, presumably to prevent heat soak what with the carb sitting right on top of the manifold and not having a heat shield.

I'm trying not to be frustrated now because I know it's something really simple holding things up, I'm just beyond my own experience with whatever the problem is. Tomorrow, providing I'm feeling well enough, I'll go through the ignition timing side of things to make sure that's all as it should be. I know I'm getting a spark, I know I have fuel, I know I have decent oil pressure and I know I have good compression. I also know the static timing is correct so there's no need to pull the engine out to recheck that.
 
Don't use easy start, we use carb cleaner its more gentle..
 
Oh, I know, it was all that was to hand and just a quick squirt to check things were doing what they should, which they sort of are but not quite.
 
I just bought a new t-piece for my R4. Is it the one fixed in the valvecover, because then it is possible to get new/nos ones.
Ive squirted a whole lot of diesel starter (easy start) into my bmw motorcycle, and its not dead yet :) Even though its some explosive stuff.
Good luck on the next fix on the car
 
The one that came off mine doesn't look like any of those, harbourseal. Which should I get?

Niels, mine fitted to the carburettor. I'll dig out a picture of it if I've got one to demonstrate.

---

An American once told me "to assume is to make an ass out of you and me". Not sure what I was doing at the time to warrant the statement, but they're words to live by nonetheless. It is with this in mind that I approached the engine in the Renault today. It's entirely likely that by assuming I've done things properly I have, in actual fact, done them wrong. So, established conventions and sound principles out the window, let's do everything by the workshop manual (not a Haynes one) as if I've never, ever seen an engine ever before. I'm going to be as in depth as I can be so if you see anything really wrong that I've done then you can point it out to me as we go along.

First of all, fight with the gear lever extension and lose one nut. Then fight with the rocker cover and the spark plug for cylinder 1 at the front of the engine until you can see what you're doing, like so.
20170221-01.jpg


The manual, it says:
20170221-02.jpg


20170221-03.jpg


I will state that at this point I set it to TDC according to the sound principle of putting something in plug hole #1 and slowly turning the engine until the something reaches the top of its travel but before it crushes said something. That gave me this, which is wrong.
20170221-04.jpg


Instead, I did it by the book and a fraction of further movement of this.
20170221-05.jpg


Got us here. Which is correct, nes pas?
20170221-06.jpg


Good. Then the weather started kicking off, typically, blowing the manual and tools all over the shop and occasionally raining in my ear. So this was going to be fun. Now, the next thing to check was the distributor which was suspected to be installed incorrectly. On removal of the distributor via the awkward clamp nut that I haven't got a C shaped spanner (that's the shank of it, not the head) to make life easier with, we can see the drive cog down in the hole.
20170221-07.jpg


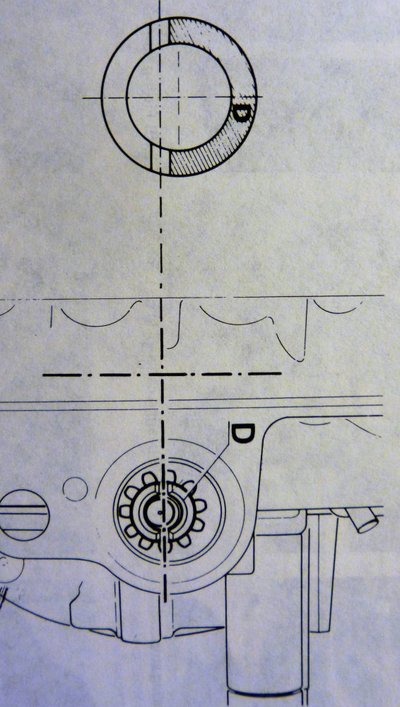
The manual says:
20170221-08.jpg


So that's wrong. I pulled out the cog and replaced it about three thousand times until it was as the book described above, like so.
20170221-09.jpg


Then the weather kicked off and blew the manual into my rapidly cooling coffee nearly throwing it off the roof and, well, I got a case of all the nopes. You'll notice as well that I need to remove the drive cog again because I've actually put it in the wrong way around with the 'fat side' towards the bulkhead rather than towards the headlights. Luckily Mike spotted that in the photographs. To finish off I hastily put the tools away, dropped the distributor and clamp back in their respective locations and shut the car up for the day.
20170221-10.jpg


It's not a lot of progress because I only had about 90 minutes spare, I was being methodical and the weather was being a big old crybaby at me. Next time I'll try and get the distributor drive cog, distributor, valve clearances, points clearance, distributor cap, spark plug and spark leads all back on. I might even have enough time to fight the rocker cover back on and find the nut that ran away.
 
Hello Vulgalour,
for every 2 rotations of the flywheel, the distributor goes around once.

When Number 1 piston is at the top of its travel, number 4 (closest to your window ) is also at the top.
2 and 3 travel together and 1 and 4 travel together.

The difference is that one will be firing and the other on the exhaust stroke.

I think that you have set your rotor pointing to the No 4 cylinder position.

To rectify this, make one more rotation with your flywheel until you see the notch again.
You will then find that the rotor points towards the right hand wheel (approximately).
 
So... I can't follow instructions? :doh: Seems likely at this point. I'm not entirely sure what I've misunderstood to have got the rotor arm in the wrong place as I thought I'd done it right and thought the valves were where they needed to be as things are in the above photographs. I wasn't going to worry about the rotor arm until I'd done the other steps before it.
 
Hi Vulgalour
I'm pretty sure that the drive cog setting you've been looking at is for the R1180 - the 'small' 845 engine. If you look at the top of the page after 'the manual says..', it says '800 engine'. Doesn't your manual have a diagram for the 688 engine?
My Autobooks R5 manual has a diagram for the 'big' 950/1108/1289 engines. It says 'Note that the driving slot must be at right angles to the engine longitudinal centre line....., with the larger offset facing the clutch' - looking at the diagram, you could say 'slots north/south, left of centre'.
The distributor position in the last picture looks wrong to me (as Mojobaby points out). I don't have a photo of the distributor position in a 688-engined R4 to hand, but could take one tomorrow if it'd help.
None of this is meant to be construed as advice, by the way - I'd double-check your manual and get more help from others on the forum.
Just out of interest, what make of distributor do you have, and what are its curves?
Best of luck!
 
Hi, Mojo is right you are 180 degrees of you need to make another full rotation on the flywheel to get the rotor arm on cilinder 1. And yes the diagram with the cog is for the Ventoux engine and not for the Cleon 688. the direction for the distributer is the same though.
As for the plastic connections. You need the T piece 1207-162 the widest part connects to the thick copper pipe on the carburetor the thinnest piece connects to the pipe underneath the carburetor on the manifold the intermediate connection goes to connector 1208-150 and that connects to the rocker cover
 
Well, if all this time I've been trying to get the car to run with the timing out 180 degrees that would explain a lot, wouldn't it? The wording in the manual makes the diagram I'm using sound like it's for the 1181 and it's the only diagram in the book I can find of that sort so I was under the impression that I'm following the correct info. Am I not?

I have no idea what the curves on the distributor are, I don't even know what that is. I think the distributor is a Ducellier, from memory, but I'd have to check when there's some light to see by to confirm that.
 
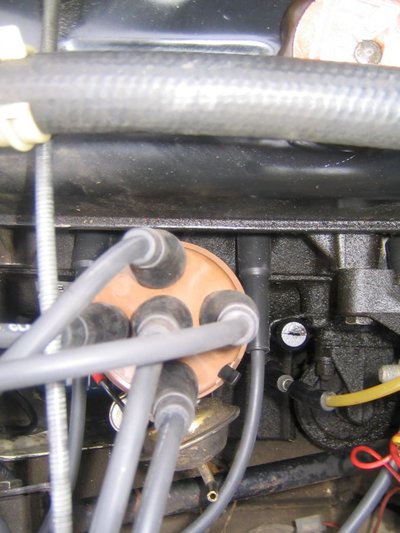
For what it's worth, I've just found a picture of the distributor set-up on a 688-engined R4. (The vacuum pipe has been removed in the picture).
Re curves: Most R4GTL owners will have distributors with R244D61 on them- I just wondered what the equivalent R6TL numbers were.


019 (2).JPG
 
Update time! Ready for some frustration? I bet you are.

First job is to rotate the flywheel a full revolution to sort the timing out. It's just about impossible to photograph the valves, but this was the before shot (I think).
20170222-01.jpg


Check the distributor drive cog and find it's back to the same place it was. So that needs to come out and be turned around so the fat side is on the side it should be.
20170222-02.jpg


Made sure my timing mark was where it should be, like so.
20170222-03.jpg


Now, the valves are in a different position to previously, but again quite difficult to photograph.
20170222-04.jpg


Turned the distributor drive cog around so it's aligned properly. This was actually much easier than my first attempt so I guess I'm getting the knack of that.
20170222-05.jpg


I was asked which distributor is fitted, so here's the details for that.
20170222-06.jpg


20170222-07.jpg


Put the distributor back in and the rotor arm now points in exactly the opposite direction to what it did before giving the flywheel one full revolution. That's to be as expected, from what I understand people telling me.
20170222-08.jpg


I also put enough pipework in and an improvised bung for the vacuum/fuel thing under the carburettor. This now appears to be working properly as the sellotape cap was deformed inward on the pipe so must be creating at least some vacuum.
20170222-09.jpg


Distributor cap and leads refitted in the correct order, connected up to the coil, a little petrol down the carb, jump leads to the Rover because I'd forgotten to fully charge the Renault's battery and we tried again.
20170222-11.jpg


This is where the frustration is because I'm sure you'll want to hear I got it running allbeit badly and much rejoicing was had. What happened instead were a few weak pops in the exhaust rather than backfiring out the carburettor but not enough to get the car to actually run. A little more accelerant was applied to the carb and again we almost got it to fire but there is another problem somewhere. It does appear the timing is as it should be now, so that's something. Even with a remote fuel source we're getting fuel up to the carb but it's not getting through it, I'm guessing there's a blockage in there somewhere. There was some black gunge around some of these holes that were previously clean.
20170222-10.jpg


I plonked the air box back on because I was fed up of moving it every time I got in the car and decided to do this update to help me troubleshoot the potential problem rather than poking blindly at something I don't understand the cause of.
20170222-12.jpg


My suspicion is that there's still a blockage in the carburettor somewhere and the spark may be too weak to make use of what fuel is getting through or put directly into the carb. I will agree that it must now be something very simple to find, it's just going to take me a while to figure it out because of my lack of experience with this sort of fault. Please be patient with me.

On a happier note, the new dash clock arrived.
20170222-13.jpg
 
Are you sure the drive cog is in the right position? Doesn't your MR manual have this diagram in it?


P1020859 (3).JPG
 
If you read my post above, the diagram in my manual is as follows:

20170221-08.jpg


This is stated as being correct for the 1181 engine and 1180 in my manual which is not a Haynes book. I can only tell you what I've done and what my instructions tell me.
 
Back
Top